Whether you’re setting up a warehouse operation for the first time or restructuring an existing one to meet the increased demand as your ecommerce business grows, it’s worth taking the time to carefully plan the physical warehouse layout and organization of your inventory storage. Thoughtful planning at this stage can significantly improve process efficiency when you implement the Descartes Peoplevox™ warehouse management system (WMS) and make future expansions less disruptive. This article offers advice on key considerations and best practices for organizing and labeling your storage locations.
This article will also be useful for warehouse professionals who are looking for hints and tips even if you are not using a WMS.
Arranging Your Warehouse Layout
When setting up a warehouse, planning the layout is a vital first step, especially as you prepare to implement a WMS.
Plan your warehouse layout so that inventory flows smoothly from one end to the other, with goods being received at one end, stored in the middle, and shipped from the other. Making the most of your available doors can really help with this process.
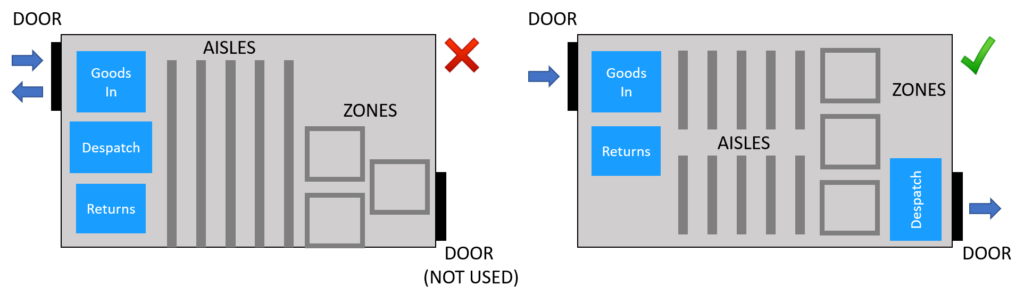
Creating a Goods In area where products can be quickly registered and stored will make a big difference, and with Descartes Peoplevox, this process can be done efficiently in a small space. It’s also worth setting up a nearby area for handling returns to keep everything running smoothly.
Your shipping area should be designed to support a seamless flow through scanning, label printing, and packing. And if your business experiences seasonal peaks, think about how the packing area can be adjusted to meet those demands.
When deciding on storage locations, think about the types of items you have and what makes the most sense—whether it’s zones, aisles, or bays. Keep in mind the height of racks and how easily items can be accessed with your equipment. Lastly, remember that each storage location will need to be barcode-labeled (see Labeling Locations).
Try and leave enough space for operators to move around and between aisles and bays. This will make picking operations more efficient when using location sequencing.
Whenever possible, store products on shelves one item deep. This way, operators won’t need to move items to reach those in the back.
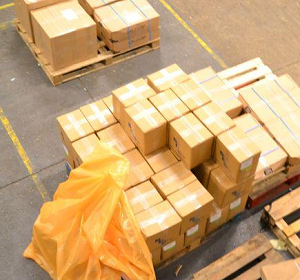
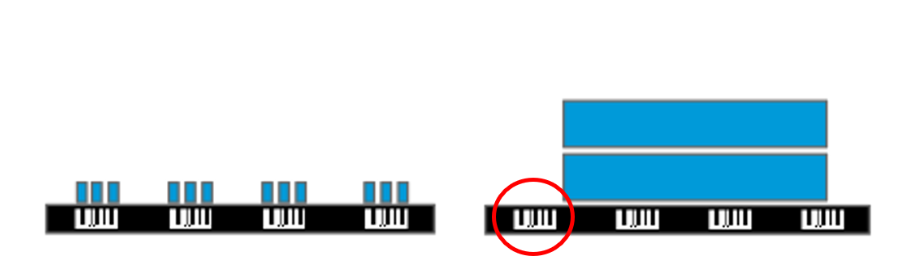
For small items, divide the shelving into smaller slots, so each slot contains fewer types of items. This will help operators find what they need more quickly when picking. The picture shows an example of shelving that could be improved by creating smaller slots.

Location Uses
As you plan your warehouse layout, it’s important to think about the different types of locations available in Descartes Peoplevox – bulk, pick, quarantine, and ship – and consider how many of each you’ll need.
Bulk locations are for storing large quantities of inventory within the warehouse. These locations are where your extra stock will be kept until it’s needed in the pick locations.
Pick locations are where items are stored for easy access to fulfill sales orders. It’s helpful to keep these locations close to the shipping area, especially for items that are in high demand, like seasonal goods or promotions. This minimizes the time your operators spend walking around during picking, which can account for up to 60% of the cost in order fulfillment.
Quarantine locations are designated for damaged or faulty items. Since inventory stored here won’t be available for picking, these areas don’t need to be as accessible.
Ship locations are where items are gathered before being packed and shipped to customers. Often, these are trolleys that move around the warehouse during picking and are then brought to the shipping bench.
It’s worth noting that some warehouses set up all locations as pick locations, which can lead to inefficiencies. Ideally, pick locations should hold just enough inventory to fulfill the day’s or shift’s orders. This helps streamline the picking process and ensures that most of your inventory is safely stored in bulk locations.
Bulk locations usually need more space for access, as forklifts are often used to move items in and out. For safety reasons, it’s best to keep bulk locations separate from pick locations. Since they don’t need to be accessed as frequently, bulk locations can also be situated further from the Goods In area.
By thoughtfully setting up these different locations, you can create a warehouse layout that’s both safe and efficient, helping your operations run smoothly and effectively.
Organizing Location Numbering
Setting up a clear and logical numbering system for your warehouse locations within your warehouse layout is key to maintaining an organized and efficient operation. Here’s how you can create a numbering system that will work seamlessly with your location barcodes.
1. Structure Your Location Groups:
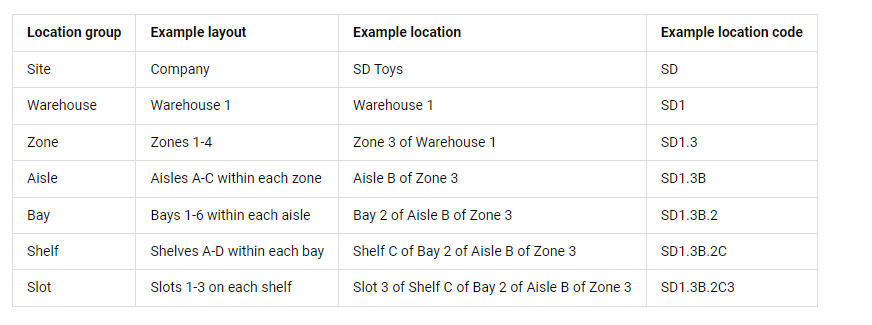
Start by organizing your warehouse’s location groups into a logical hierarchy, typically based on physical capacity. This might look something like: Site – Warehouse – Zone – Aisle – Bay – Shelf – Slot/Box. Even if you currently only have one site or warehouse, assigning codes to each level now can save you from having to relabel everything if your business expands in the future.
2. Assign Codes to Each Level:
Assign numbers or letters to each level of your hierarchy. To keep the coding clear and easy to read, it’s helpful to alternate between letters and numbers (e.g., Zone A, Aisle 1). This approach ensures that your coding is both systematic and straightforward.
3. Logical Numbering:
When assigning codes to physical objects within each location group (like zones or aisles), start numbering from the point closest to a wall and increase the values outward. This allows the coding to expand logically as your warehouse grows. Similarly, start numbering shelves from the floor and work your way up, so that you can easily add shelves above without disrupting the existing code structure. Consistency in your numbering approach is crucial.
4. Create Unique Location Codes:
Use the structure you’ve established to create unique codes for the final level in your hierarchy—the individual locations themselves. These codes will be what you print on your location labels in the warehouse.
5. Formatting Tips:
To make the codes easier to read, consider using dots between characters (e.g., A.1.1). Dots are preferable to dashes as they take up less space on labels and are easier to type into handheld devices. However, be aware that some barcode types don’t support characters other than letters and numbers. Before printing and applying labels, check that the barcode type you’re using is compatible with your chosen format. If you’re unsure, it’s safer to avoid using dots or dashes to prevent any discrepancies between the location codes on the labels and those stored in Descartes Peoplevox.
By following these steps, you’ll create a clear, flexible, and scalable location numbering system that supports efficient warehouse operations and future growth. See example below.
Labeling Locations
Once your barcode label printer and templates are set up, you’re ready to print location labels using the codes you’ve developed based on your warehouse layout.
Here’s how to do it:
- Access the Locations Tab:
In the Descartes Peoplevox web app, navigate to the Warehouse module and go to the Locations tab.
- Navigate to Your Locations:
Click through the location hierarchy until the specific locations are displayed in the tab window.
- Select Locations for Printing:
Check the Print box next to each location label you want to print.
- Print the Labels:
Click the Print button.
- Choose Printer and Template:
In the Select a printer dialog, choose your desired printer from the list and select a template from the drop-down menu. If you want to save your printer selection for future use, you can tick the Remember the printer selection option.
- Finalize Printing:
Click OK, and your location labels will be printed.
When selecting a label template, it’s important to choose the right size to ensure all necessary information is clearly displayed. The 76 x 51 mm label is ideal for most locations, while the 51 x 26 mm label is better suited for smaller slots on shelves. Ensuring your labels are clear and easy to read will make a big difference in maintaining an organized and efficient warehouse.
You can find tips and suggestions on placing your location labels below:
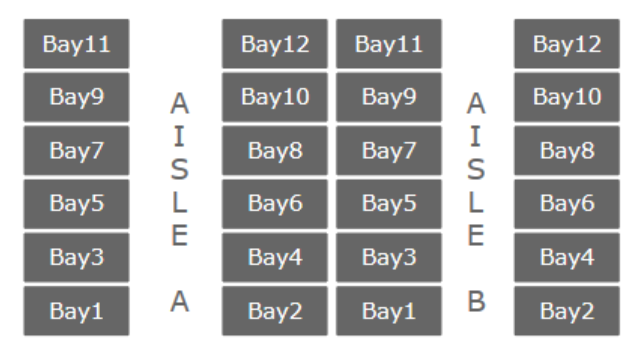
- If you label bays facing each other with odd and even numbers as shown in the image below, it will enable a more efficient pick sequencing to be set up.
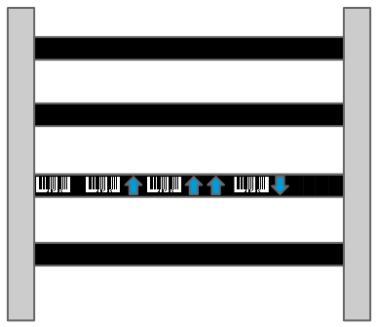
- Racking with multiple shelves can also be labelled at a single level for ease of scanning. Use single or multiple arrows to indicate the location barcodes for the shelves 1, 2, 3, and levels above or below the label.
- If you sell various sized SKUs, you can store smaller items in locations and increase the number of slots on the shelf. Bigger items can still be placed in the slots and scanned with the barcode furthest to the left.
- When labelling areas of open floor used to hold inventory, remember that barcodes do not survive if stuck directly to the floor unless in a protective case. It is more common to put items on to pallet bases and label these. Some warehouse operators also hang location barcode labels from the ceiling – we have seen this work extremely well in a lot of our customers’ warehouses.
- If you decide to label trolleys with round frames with location barcodes (for example, as ship locations), it is recommended that you place the barcodes vertically as they do not read well on curves – these small improvements are making your warehouse 1% more efficient with every change.
- We find most operatives are right-handed and will tend to hold items in their left hand while scanning with their right hand. Bear this in mind when placing the locations barcode labels, and also consider the picking route that operators will take through the warehouse as this may mean that the optimum position for labels will be different between adjacent aisles if operators move along them in opposite directions.
- Avoid placing barcodes immediately adjacent to each other as this can cause the wrong barcode to be scanned, this is more common if older scanners are being used that read from a horizontal beam. Separate or offset the labels to avoid this or tilt them slightly to the right (this can also help avoid repetitive strain for operators scanning the labels).
- If you see layout changes in the warehouse on the horizon, it is worth applying barcode labels to magnetic tape so they can be quickly moved around as needed.